

How To Create A Backlight Effect In Photoshop
Create a kaleidoscope event in Photoshop
There are plenty of collage maker tools out there, but none are quite as satisfying as creating your own collage using Photoshop CC or similar software. The kaleidoscope effect above was discovered when trying to combine photography and collage elements, and here nosotros'll take it a step further. You can apply this method to any existing imagery, turning it into an abstract, intriguing blueprint.
Over the following steps, I'll show yous how to create a circuitous-looking prototype: we'll experiment with a variety of imagery, marks and photos – or whatsoever elements y'all already have – to build upwardly a digital collage with a handmade feel. And dissimilar when you lot're creating purely handmade work, the possibilities to experiment are countless considering you tin always click Disengage. In one case created, you can accept your prototype and turn information technology into a fascinating pattern, background or wallpaper.
- Software: Photoshop (opens in new tab) CS4 or later
- Project time: two-3 hours
- Skills: Combine handmade and digital elements, use Layer Styles, create patterns
- Download the back up file here
01. Create a hexagon
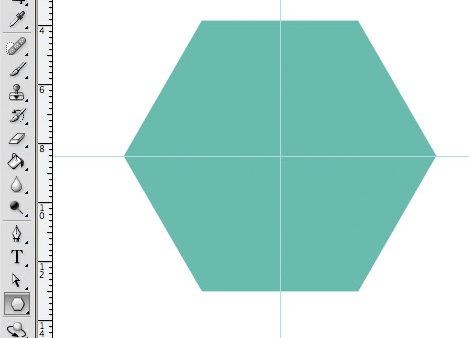
First, open up Photoshop and create a hexagon in an A4 document. This is the basic shape that your kaleidoscope will follow. For a more intricate, abstract appearance, create a shape with more sides. Using the Polygon tool, make a fairly large hexagon, and so drag rulers from the tiptop and side to observe the heart of the shape - they will snap to the middle.
02. Create a triangle
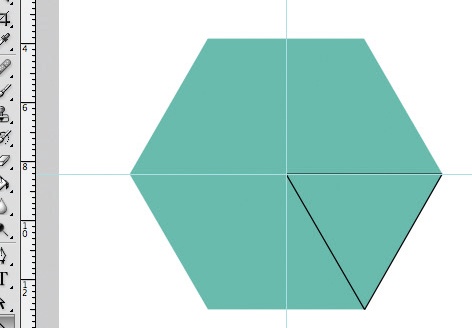
Using a dissimilar color to the hexagon, select the Line tool with a 5px weight. Draw iii lines to create a triangle from the centre point out to one of the straight sides, then merge these three layers together. This triangle will be a guide for the shapes and the size of the prototype you create.
03. Import your image
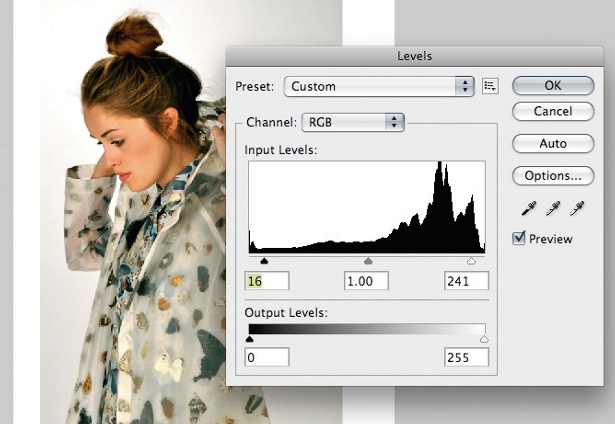
Open a new A4 document and place a photograph of a effigy (I've supplied one, but feel free to use your own) in the eye. Use Levels (Cmd/Ctrl+Fifty) to burnish up the image, slightly increasing the black and decreasing the white levels. At this stage you lot could edit out the background completely if you wish, to make a cleaner prototype.
04. Drag over the triangle
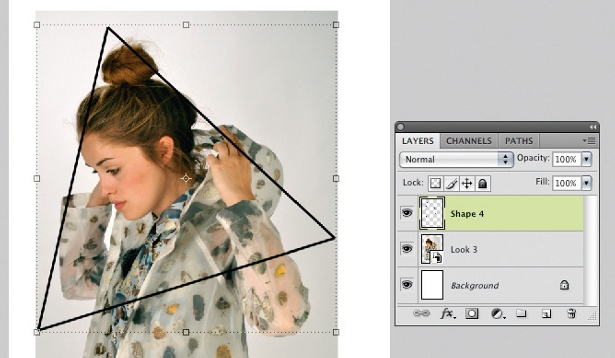
Return to your commencement hexagon document and drag the triangle over to the document with the placed photo in information technology. This will be used every bit a guide for creating the collage on peak of the photo. You can change the size of the triangle and move it effectually until y'all decide which part of the photo that you wish to apply.
05. Create some funky patterns
It's fourth dimension to pace away from the screen and create some handmade marks, patterns and shapes using materials such every bit ink and spray paint. The marks I've chosen are adequately organic to dissimilarity with the structured nature of the kaleidoscope. When yous're done, scan in the materials (or apply the ones included).
06. Tidy upward your marks
Open the marks in Photoshop and decide which ones you lot want to utilise. With the Rectangular Marquee tool, select each marker, and copy and paste each one into a new layer so that they can be edited individually. Now delete the background layer of your initial marks. Using levels once more, greatly increase the black and reduce the white to make the marks more solid.
07. Add a marker
Choose the black spray paint mark supplied, and drag it over to your photograph certificate. Using the Magic Wand tool, select the white space effectually the mark and delete information technology. Invert the colour of the mark (Cmd/Ctrl+I) to make it white, and place it in one corner of the triangle. Using the Hand tool, hold down Opt/Alt and drag the mark to duplicate it and place it in another corner. Repeat again for the terminal corner.
Next folio: the remaining steps

Thanks for reading 5 manufactures this month* Bring together now for unlimited access
Enjoy your first month for just £1 / $one / €1
*Read v free articles per calendar month without a subscription
Join now for unlimited access
Try first month for only £1 / $ane / €one
Related manufactures
Source: https://www.creativebloq.com/photoshop/kaleidoscopic-collage-effect-5132671
Posted by: stillmanwasonerecied.blogspot.com
0 Response to "How To Create A Backlight Effect In Photoshop"
Post a Comment